This will be the post you all must be finding, as in this post i m telling you how to add Facebook brand new shinny Send button to all your post. Adding the Facebook send button you are making it easy for your users to share it with their friends on their email and also the readers don't need to leave the blog. By adding send button you are helping your users to send the post to someone in a very simple way, you can also send it to your friends or someone who is not in your friend list by simply adding the email address. As it makes your post popular among your friends and helps in increasing traffic to your site or blog.
It is a regular 'Email this' button with integrated Facebook Email. TRY FACEBOOK LIKE AND SEND COMBO BUTTON

ADD SHINNY FACEBOOK SEND BUTTON
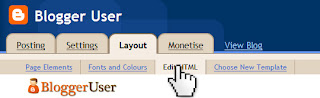
2). Select Layout and Edit HTML.

<div class='post-header-line-1'>
NOTE :- If you do not find this code, find <div class='post-header-line-1'/>
<div id="fb-root"></div>
<script src="http://connect.facebook.net/en_US/all.js#xfbml=1"></script><fb:send expr:href='data:post.url'></fb:send>
It is a regular 'Email this' button with integrated Facebook Email. TRY FACEBOOK LIKE AND SEND COMBO BUTTON
ADD SHINNY FACEBOOK SEND BUTTON
1). Open your blog and go to Dashboard.
3). Check 'Expand Widget Templates' option.

4). To place the button at the top of your post Find the following piece of code in your blog HTML code. HOW TO FIND CODE IN YOUR BLOG HTML CODE
NOTE :- If you do not find this code, find <div class='post-header-line-1'/>
-- To place the button at the bottom of your post Find the following piece of code in your blog HTML code and past.
<div class='post-footer'>NOTE :- If you do not find this code, find <data:post.body/>
7). Copy and Paste the following code just below the code you have searched.
<script src="http://connect.facebook.net/en_US/all.js#xfbml=1"></script><fb:send expr:href='data:post.url'></fb:send>
8). The last and the most important step, Save you template.
If you got a good experience than leave comments and Email Me for any assistance.
If you got a good experience than leave comments and Email Me for any assistance.


No comments:
Post a Comment